Laminate
Laying laminate flooring
We have developed detailed and clear instructions on how to lay laminate, and supplemented it with practical tips. If you follow them, even an inexperienced person can easily install laminate and take into account all the nuances of this process.
1. What you'll need
Important! Before laying laminate, carefully read the manufacturer's instructions.
Materials
Tools

The Council
For straight and longitudinal cutting with an electric saw, choose a t101b type saw. But keep in mind-marking for this type of saw is done from the back of the Board. With a curved cut, the t101ao type of saw is best handled.
If you prefer to work with a hand tool, choose a hacksaw with a small tooth — 15-16 TPI. But then you will need a tool for cutting out pipes and other curved protrusions, such as a circular saw for a drill.
Call the assistant. You can handle it alone, but two will be more convenient, faster and easier.
2. Preparation of materials
Let the laminate in its original packaging lie in a horizontal position for 48 hours in a warm and dry room-at a temperature of 18-25 °C and a relative humidity of 40-60%.
Unpack the substrate and leave it to acclimatize for 24 hours in a warm and dry room-at a temperature of 18-25 °C and a relative humidity of 40-60%.

Before starting the installation, check the laminate for defects. Check the condition of the locks separately. They must be free of damage and debris to ensure a reliable grip of the laminate, without gaps and height differences at the junction of the boards.
The Council
Open several packages and distribute the boards so that the pattern is uniform.
If this is not done, there is a risk to lay several boards with the same texture in a row and get an unsightly accent on the floor.

3. Preparation of base for laying
If there were soft coverings on the surface of the base (carpet, linoleum, vinyl tiles), they must be removed.

Make sure that the base of the future floor:


Standard cement screeds dry to the desired humidity within 1-7 weeks, quick-drying-in 1-5 days. You can always get more precise information from the manufacturers of leveling mixes.
Lay a layer of vapor barrier on the base with a 3-5 cm approach to the walls. The overlap of the vapor barrier sheets should be at least 20 cm. Glue the fabric joints with adhesive tape.
Lay a substrate on top of the vapor barrier.
The sheet substrate is laid in a staggered order, the natural substrate - at 45 degrees to the direction of the laminate boards, rolls-transversely with respect to the laminate. A situation where the seam of the substrate is uniform and continuous across the entire room or coincides with the seams of the laminate, may lead to defects in the laying of the laminate.
Glue the joints of the substrate with adhesive tape.

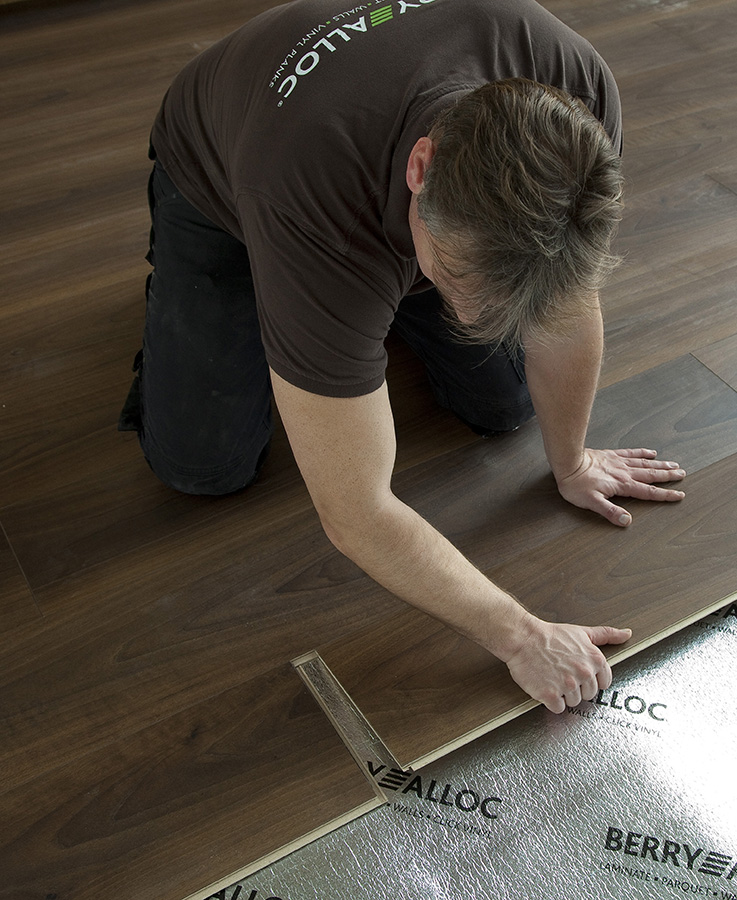
4. How to lay laminate: laying the first row
Choose the direction of laying the laminate parallel to the incident light.
Place the first Board with the ridge against the wall, 10 mm away. Control the size of the expansion gap using spacer wedges.
The Council
Laminate without chamfers, for example, from the collections of IMPULSE or OCEAN, and with chamfers, for example, from the collections of CYCLONE or ENIGMA, it is recommended to lay parallel to the incident light. So long longitudinal joints are less noticeable, and the floor will look like a single canvas.
If you chose a laminate with a 2G lock (form or LOOK collections), then:
connect the next Board on the end side at an angle of ~15° to the previous one and lower it to the floor; build in rows.

If the laminate has a 5g lock (for the ETERNITY or RASPBERRY collections), then:
press the next Board against the previous one on the end side until it clicks;
build one Board at a time.
Important!
Laying laminate is done in a floating way. Boards are connected to each other, but do not attach to the base of the floor.
Do not fix the laminate to the base with glue, screws or nails.

5. Laying the second and subsequent rows
To start the second row, use a section of the Board from the first row, if it is at least 30 cm. Make sure that the staggered offset of the end joints between the rows is at least 30 cm. If your laminate has a 2G lock: assemble the next row entirely, connect it to the previous one at an angle and lower it to the floor. If your laminate has a 5g lock:
connect the Board to the previous row at an angle of ~15° and lower it to the floor.
Connect the next Board in the second row to the previous row at an angle and press it against the next Board until it clicks.

6. Laying the last row
The width of the last row must be at least 5 cm. Lay the boards with the sawed-off side against the wall and press them down with a Z-shaped bracket.
The Council
Measure the width of the room in advance. If the width of the future last row is less than 5 cm, file the boards of the first row to the required distance.

7. Bypassing pipes and protruding structures
Cut holes for bypassing the heating pipes taking into account the expansion gap of 10 mm:
Ø hole = Ø of the pipe + 20 mm.

After laying the laminate, you can mask the gaps by using special overlays on the pipes. When cutting holes to bypass other fixed structures, also leave an expansion gap of 10 mm.
8. Maximum area of a single laminate sheet
Make a gap on the border of the room in the doorway.
This will avoid deformation of the laminate due to changes in temperature and humidity in the room.
Wood door frames file a distance equal to the thickness of the laminate along with the substrate.
Place the Board face down next to the door frame.
Trim the box, then insert the Board under it. Keep the expansion gap under the doorway 8-10 mm!
Mask the expansion gap with a threshold. Do not try to assemble a solid sheet of laminate over the entire area of the apartment.
The maximum permissible dimensions of a room that can be covered with a single cloth are specified in the manufacturer's instructions.
9. Fixing the skirting Board and threshold profiles
Fasten the skirting Board to the wall and the threshold profiles to the floor base.
Make sure that the fasteners — screws and nails — do not enter the laminate boards.

1. What you'll need
Important! Before laying laminate, carefully read the manufacturer's instructions.
Materials
- Laminate
- Substrate
- Vapor barrier with a thickness of at least 0.2 mm. If you use a vapor barrier substrate, a separate layer of vapor barrier is not required.
- Adhesive tape for bonding the seams of the substrate and vapor barrier, for example, metallic tape SOLID AQUA STOP. Some substrates already contain adhesive tape in the kit.
Tools
- Electric jigsaw
- Hammer
- Roulette
- Square
- Spacer wedges
- Z-shaped metal bracket
- Padding block
- Pencil
The Council
For straight and longitudinal cutting with an electric saw, choose a t101b type saw. But keep in mind-marking for this type of saw is done from the back of the Board. With a curved cut, the t101ao type of saw is best handled.
If you prefer to work with a hand tool, choose a hacksaw with a small tooth — 15-16 TPI. But then you will need a tool for cutting out pipes and other curved protrusions, such as a circular saw for a drill.
Call the assistant. You can handle it alone, but two will be more convenient, faster and easier.
2. Preparation of materials
Let the laminate in its original packaging lie in a horizontal position for 48 hours in a warm and dry room-at a temperature of 18-25 °C and a relative humidity of 40-60%.
Unpack the substrate and leave it to acclimatize for 24 hours in a warm and dry room-at a temperature of 18-25 °C and a relative humidity of 40-60%.
Before starting the installation, check the laminate for defects. Check the condition of the locks separately. They must be free of damage and debris to ensure a reliable grip of the laminate, without gaps and height differences at the junction of the boards.
The Council
Open several packages and distribute the boards so that the pattern is uniform.
If this is not done, there is a risk to lay several boards with the same texture in a row and get an unsightly accent on the floor.
3. Preparation of base for laying
If there were soft coverings on the surface of the base (carpet, linoleum, vinyl tiles), they must be removed.
Make sure that the base of the future floor:
- dry — the maximum humidity for a wooden base is no more than 50%, cement — no more than 2 CM%, for gypsum-no more than 0.5 CM%;
- level — height difference of no more than 4 mm for every 2 meters;
- strong and dust - free — use a metal object (such as a key) on the base, if dust has formed-strengthen the base with a primer.
- Important!
Standard cement screeds dry to the desired humidity within 1-7 weeks, quick-drying-in 1-5 days. You can always get more precise information from the manufacturers of leveling mixes.
Lay a layer of vapor barrier on the base with a 3-5 cm approach to the walls. The overlap of the vapor barrier sheets should be at least 20 cm. Glue the fabric joints with adhesive tape.
Lay a substrate on top of the vapor barrier.
The sheet substrate is laid in a staggered order, the natural substrate - at 45 degrees to the direction of the laminate boards, rolls-transversely with respect to the laminate. A situation where the seam of the substrate is uniform and continuous across the entire room or coincides with the seams of the laminate, may lead to defects in the laying of the laminate.
Glue the joints of the substrate with adhesive tape.
4. How to lay laminate: laying the first row
Choose the direction of laying the laminate parallel to the incident light.
Place the first Board with the ridge against the wall, 10 mm away. Control the size of the expansion gap using spacer wedges.
The Council
Laminate without chamfers, for example, from the collections of IMPULSE or OCEAN, and with chamfers, for example, from the collections of CYCLONE or ENIGMA, it is recommended to lay parallel to the incident light. So long longitudinal joints are less noticeable, and the floor will look like a single canvas.
If you chose a laminate with a 2G lock (form or LOOK collections), then:
connect the next Board on the end side at an angle of ~15° to the previous one and lower it to the floor; build in rows.
If the laminate has a 5g lock (for the ETERNITY or RASPBERRY collections), then:
press the next Board against the previous one on the end side until it clicks;
build one Board at a time.
Important!
Laying laminate is done in a floating way. Boards are connected to each other, but do not attach to the base of the floor.
Do not fix the laminate to the base with glue, screws or nails.
5. Laying the second and subsequent rows
To start the second row, use a section of the Board from the first row, if it is at least 30 cm. Make sure that the staggered offset of the end joints between the rows is at least 30 cm. If your laminate has a 2G lock: assemble the next row entirely, connect it to the previous one at an angle and lower it to the floor. If your laminate has a 5g lock:
connect the Board to the previous row at an angle of ~15° and lower it to the floor.
Connect the next Board in the second row to the previous row at an angle and press it against the next Board until it clicks.
6. Laying the last row
The width of the last row must be at least 5 cm. Lay the boards with the sawed-off side against the wall and press them down with a Z-shaped bracket.
The Council
Measure the width of the room in advance. If the width of the future last row is less than 5 cm, file the boards of the first row to the required distance.
7. Bypassing pipes and protruding structures
Cut holes for bypassing the heating pipes taking into account the expansion gap of 10 mm:
Ø hole = Ø of the pipe + 20 mm.
After laying the laminate, you can mask the gaps by using special overlays on the pipes. When cutting holes to bypass other fixed structures, also leave an expansion gap of 10 mm.
8. Maximum area of a single laminate sheet
Make a gap on the border of the room in the doorway.
This will avoid deformation of the laminate due to changes in temperature and humidity in the room.
Wood door frames file a distance equal to the thickness of the laminate along with the substrate.
Place the Board face down next to the door frame.
Trim the box, then insert the Board under it. Keep the expansion gap under the doorway 8-10 mm!
Mask the expansion gap with a threshold. Do not try to assemble a solid sheet of laminate over the entire area of the apartment.
The maximum permissible dimensions of a room that can be covered with a single cloth are specified in the manufacturer's instructions.
9. Fixing the skirting Board and threshold profiles
Fasten the skirting Board to the wall and the threshold profiles to the floor base.
Make sure that the fasteners — screws and nails — do not enter the laminate boards.